Using mock data and API stubs
Using mock data during app prototyping is essential for creating a realistic and functional representation of the final product, without needing a fully implemented backend. With mock data, designers can validate their designs by seeing how real-world content will look within the app. This includes testing the layout, visual hierarchy, and responsiveness of various elements such as text, images, and buttons.
JitBlox lets you create your own mock datasets to test your designs with your own, realistic data. In this tutorial, you'll learn how to create API stubs and mock datasets and how to use them to build a dynamic, data-driven user interface. You'll learn how to create For each loops, pass data between custom components, and reuse the same custom component to display different datasets. The end result of this tutorial is a dashboard that displays various "work items" such as bugs and user stories.
For the sake of completeness, let us first clarify the differences between the two terms:
- Mock data: Mock data is created to resemble real data but does not originate from actual users or operational systems. However, it mirrors the format and structure of real data, ensuring that the application can be tested under realistic conditions.
- API stub: Every web app has a backend: a server that provides the app with data. Data is delivered to the Web app via APIs (Application Programming Interface). An API stub simulates the behavior of a real API. It acts as a placeholder for the real API and returns predefined mock data.
Although not the focus of this tutorial, there is another benefit to using API stubs: JitBlox also generates most of the code needed to connect to a real backend, which is a huge time saver when your project evolves.
Getting started
To kick things off, let's grab a copy of the starter template for this tutorial:
- Make sure you are logged in.
- Open the tutorial's starter project in the designer.
- Hit the "Save As..." button at the top to get your own copy of the project.
- You might want to click on "Live Preview" button in the designer (opens a new browser window) to see how the initial application looks.
The starter template (which targets Bootstrap 5) comes with a few things already set up. The most important ones are:
- Root component: This component,
App (root)contains the main layout: a header for navigation and a Router outlet for displaying the currently active page. In this tutorial, we will leave the root component as is. - Data model: We cannot create and use a mock dataset without telling JitBlox about the structure of our data.
Therefore we've prepared a minimal data model with only one type named
WorkItem. This type will represent a task, bug or user story on our dashboard. - A WorkItemList component: This component (in Components/WorkItems) is responsible for showing a list of work items. We are going to add some basic UI elements here during this tutorial.
- A Dashboard page: This page (in Pages/Dashboard) is going to use our stub API to fetch tasks, bugs and user stories and present them to the user using a responsive CSS grid and the WorkItemList component.
1. Creating the API stub
Let's start by creating a new API stub that will return our mock data. In the Project Explorer, open the API Stubs panel, click "Create a new stub" and
name it WorkItemsApi. For now, we'll leave the Operations section as is and move on to the Mock data section.
2. Building the first mock dataset
The first mock dataset we'll create is a fictitious bug list. Click the "+" icon above the Mock data section and enter/select the following details in the dialog:
- Name: bugs
- Type: WorkItem
Hit "OK" and notice our initial, but empty, dataset. Typically, you would now add records to the dataset by clicking the plus
icon and entering all properties manually, but for this tutorial we'll take a shortcut: the dataset editor also has a JSON mode
that lets us paste our dataset as JSON snippet, as long as it matches the structure of - you guessed it - a list of WorkItems.
- Click the (edit as JSON) icon at the bottom right of the editor.
- Replace the current content ("[]") with the following data and confirm:
[
    {
        "id": "HE2BkE",
        "title": "Fix header layout on mobile",
        "summary": "Duis gravida dolor vitae magna finibus, non dictum ipsum rutrum. Sed eu neque scelerisque, accumsan felis in, auctor tortor.",
        "dateCreated": "2025-04-15"
    },
    {
        "id": "qNdzn3",
        "title": "Internal server error after confirming email",
        "summary": "Nulla rhoncus ligula sit amet tortor laoreet suscipit. Morbi consequat porta diam vel fermentum.",
        "dateCreated": "2025-04-16"
    },
    {
        "id": "CZ0OG3",
        "title": "Unable to update profile picture",
        "summary": "Pellentesque habitant morbi tristique senectus et netus et malesuada fames ac turpis egestas. Suspendisse feugiat venenatis diam.",
        "dateCreated": "2025-04-16"
    },
    {
        "id": "bg862c",
        "title": "Sticky footer dissapearing on some screens",
        "summary": "Class aptent taciti sociosqu ad litora torquent per conubia nostra, per inceptos himenaeos.",
        "dateCreated": "2025-04-17"
    }
]
If all went well, you now have your first mock dataset with 4 bugs in it.
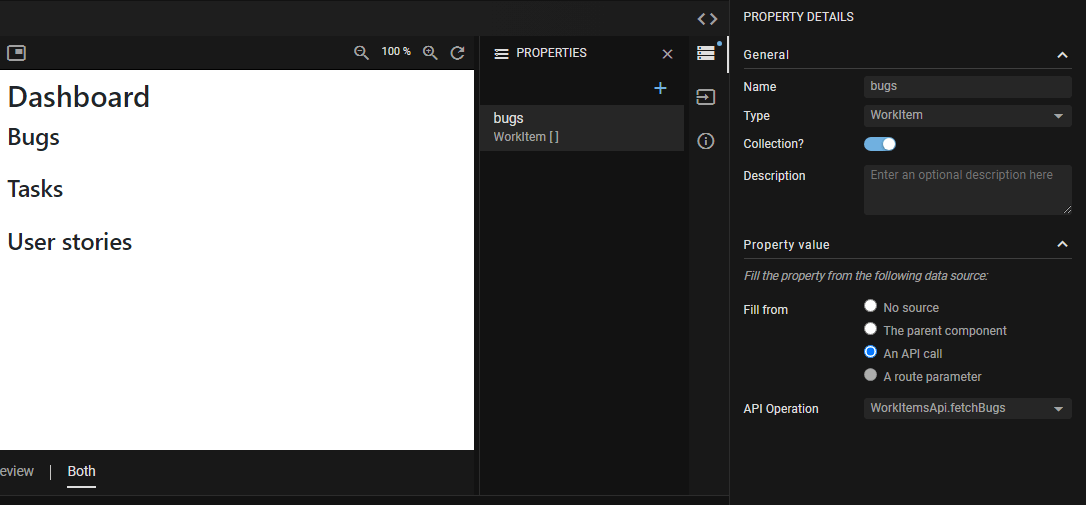
3. Let the API stub return our list of bugs
Now let's add the first API operation that returns our fictitious list of bugs. Add a new operation by
clicking the "+" icon above the Operations section and name the operation fetchBugs.
Then, in the Operation details panel on the right, configure the operation as follows:
- Return type: WorkItem
- Collection: enabled
- Mock dataset: bugs
4. Using the API stub on the dashboard
In order to use our mock bug list on the dashboard, we need to tell the dashboard page to use the
fetchBugs operation that we just created. This requires only a few simple steps:
- Open the Dashboard component and click the storage (Properties) icon in the right sidebar of the component designer.
- Click "Create a new property".
- Name the property bugs, choose WorkItem for the type and make sure to check the This property is a collection box.
- After confirming, go to the Property details panel on the right and find the Fill from configuration.
- Change the selected option to An API call.
- For the API Operation, select WorkItemsApi.fetchBugs.
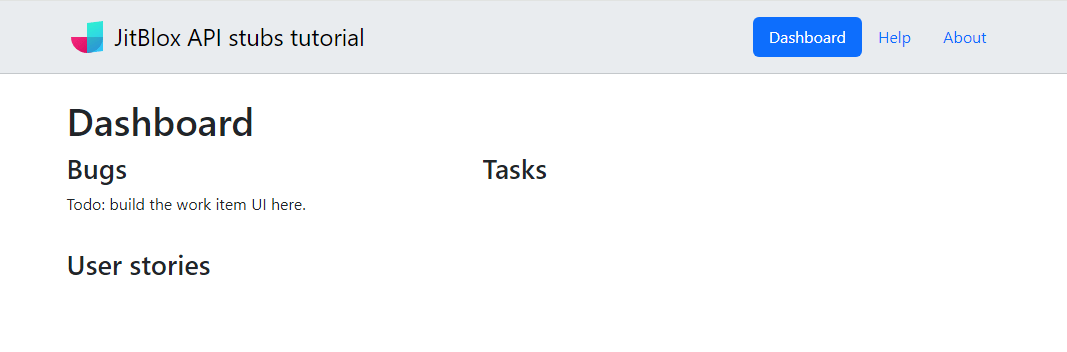
5. Adding the first work item list to the dashboard
Time to flesh out the UI! Before we further work out the WorkItemList component, let's first add an instance of it to the dashboard so that we can see how it evolves while we build a UI for our dataset.
- Open the dashboard page and find the "Bugs" heading.
- Choose "Insert Below" (or hit the "b" key) and find the WorkItemList component in the toolbox.
- Click "Configure", and set the
workItemsproperty to bugs. - Click "OK", and notice a new "Todo:..." placeholder in the Live Preview.
6. Completing the WorkItemList component
Now let's bring the WorkItemList to life and add make it show a list of work items (note that the UI will be very basic, the rest is left as an exercise for the reader).
One more note before we start: the component already has a property named "workItems" (this is the one we assigned our bugs to in the previous step). You can inspect it by clicking the storage (Properties) icon in the right sidebar of the component designer. The property has its "Fill from" configuration set to "The parent component", which is (in our case) the Dashboard that passes on data from our API stub to the WorkItemList.
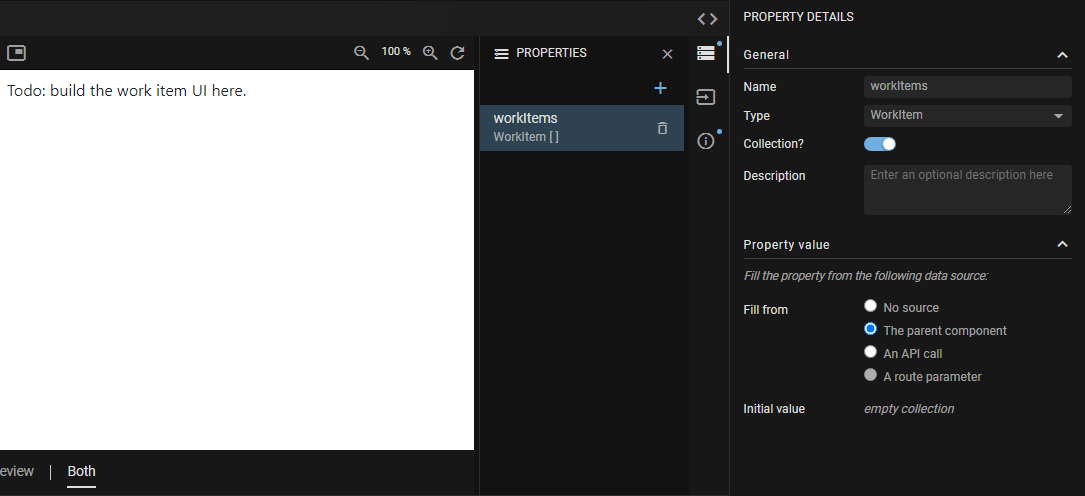
workItems property of the custom WorkItemList component.Now, let's replace the placeholder with a list of work items.
- Open the WorkItemList component.
- Delete the placeholder paragraph "Todo: build the work items UI here.", so that the containing div is the only remaining element.
- Select the containing div (a basic div that has a vertical Flex layout) and choose Insert ("+").
- Find the For each widget (in the Structural category) and click "Next".
- In the Collection input that appears, select
workItemsand confirm.
Next, we are going to add a heading that displays the title of each work item.
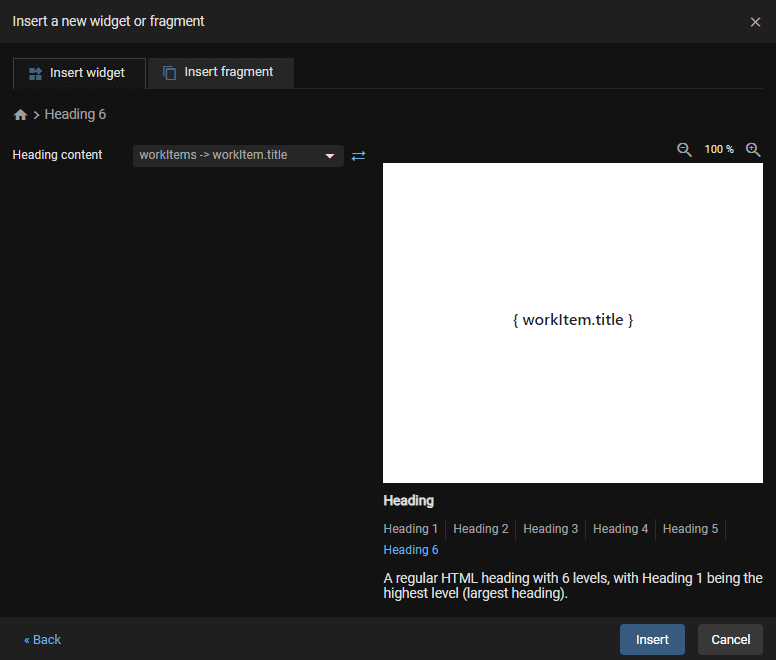
- With the For each selected, choose Insert ("+") again and locate the H6 element (just search for "h6").
- Click "Configure" and notice the default heading content.
- Click the icon next to the text input, which changes the content from a static value to a dynamic, data-bound one.
- From the dropdown, select
workItems -> workItem.titleand click "Insert".
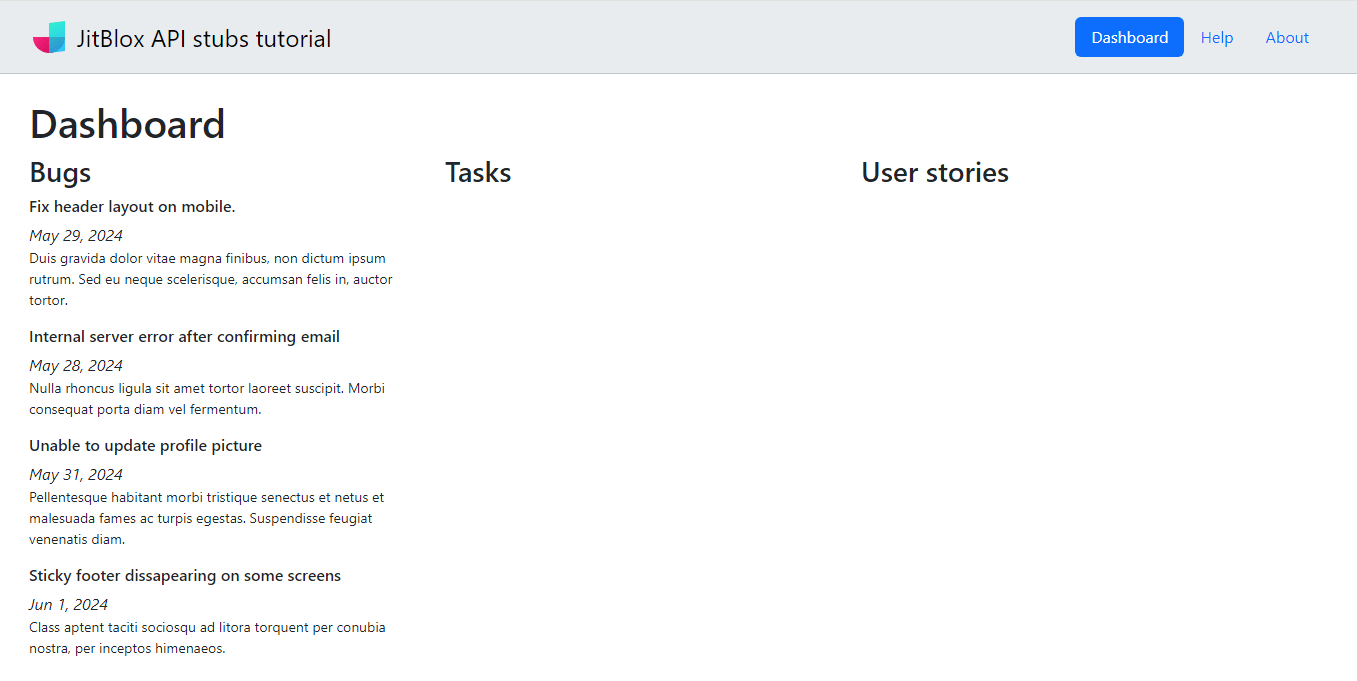
If all went well, the dashboard in the Live Preview now shows 4 titles in the Bugs column. Now, let's add a few more elements to show other work item properties.
- With the For each selected, choose Insert ("+") again and locate the em (emphasis) element.
- Repeat the same steps that we just did for the work item title, but bind this element to
workItems -> workItem.dateCreatedinstead. - Finally, add a p (paragraph) element in the same way and bind it to
workItems -> workItem.summaryinstead.
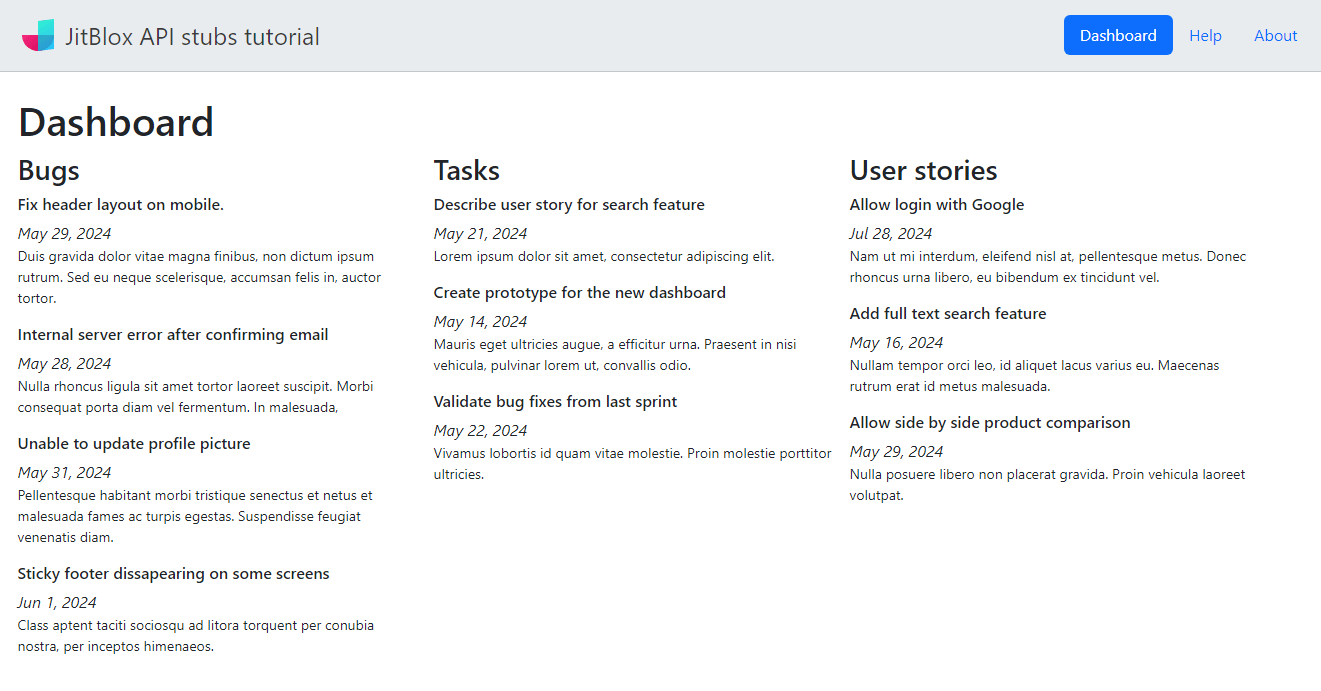
Your dashboard should now look something like this:
7. Completing the dashboard
So we now have a working dashboard with a working bug list, which means we have essentially achieved the goal of this tutorial. What remains now is to fill in the Tasks and User stories columns, which boils down to repeating steps 2 through 5 from this tutorial but with different data and different property names. We'll leave this as an exercise for the reader. Below you will find sample JSON data for both remaining work item types. Or, you might want to have a look at the final version of the work items project instead.
Sample data for Tasks
[
    {
        "id": "vKGmIc",
        "title": "Describe user story for search feature",
        "summary": "Lorem ipsum dolor sit amet, consectetur adipiscing elit.",
        "dateCreated": "2025-04-16"
    },
    {
        "id": "bIPOZM",
        "title": "Create prototype for the new dashboard",
        "summary": "Mauris eget ultricies augue, a efficitur urna. Praesent in nisi vehicula, pulvinar lorem ut, convallis odio.",
        "dateCreated": "2025-04-17"
    },
    {
        "id": "gQkFNG",
        "title": "Validate bug fixes from last sprint",
        "summary": "Vivamus lobortis id quam vitae molestie. Proin molestie porttitor ultricies.",
        "dateCreated": "2025-04-19"
    }
]
Sample data for User stories
[
    {
        "id": "c9V5Gv",
        "title": "Allow login with Google",
        "summary": "Nam ut mi interdum, eleifend nisl at, pellentesque metus. Donec rhoncus urna libero, eu bibendum ex tincidunt vel.",
        "dateCreated": "2025-04-15"
    },
    {
        "id": "wEHvqz",
        "title": "Add full text search feature",
        "summary": "Nullam tempor orci leo, id aliquet lacus varius eu. Maecenas rutrum erat id metus malesuada.",
        "dateCreated": "2025-04-19"
    },
    {
        "id": "7iWH0b",
        "title": "Allow side by side product comparison",
        "summary": "Nulla posuere libero non placerat gravida. Proin vehicula laoreet volutpat.",
        "dateCreated": "2025-04-19"
    }
]