Connecting the UI to data (quick start part 3)
This is the last part of our three-part quick start tutorial. If you have completed the first two parts then you have now created a base application layout and a working side navigation. If you skipped the second part, no problem: open this project and click Save As to have a starting point for part three.
For your reference, the quick start tutorial consists of the following parts:
- Creating the application layout
- Navigating between pages
- Connecting the UI to data (this part)
In this section we will further develop the "Destinations" page by adding a data-driven image grid of travel destinations. For a general introduction to data binding, please refer to the data binding documentation. First, we start by connecting the UI to a simple dataset, that is, a list of destination names. Then we'll create a slightly more enhanced dataset so that you can see how to easily create a data type yourself.
Creating a collection of destination names
Implementing data binding starts with creating a component property. Component properties can be found in the sidebar on the left side of the component editor. To add a new property to hold the destination names, follow these steps (or check out the video below):
- Open the Destinations component and open its properties panel from the sidebar.
- In the properties panel, click Create a new property.
- In the dialog box that pops up, enter "destinationNames" for the property name, select
stringas the type and make sure to check This property is a collection. - Click OK and notice the new property.
Populating with mock destination names
In order to see the component in action, we will of course also need some test data. Let's populate our new property with a list of 10 destination names.
- Make sure the details pane of the
destinationNamesproperty is open and locate the Initial value. - Click on empty collection to open the data editor.
- Normally, in the data editor, you add new items to the collection by clicking the "+" button. Today, however, we'll use an alternative method and import data from a JSON snippet:
Click on the edit as JSON icon in the bottom right corner to bring up the text input. - Now copy/paste the following JSON snippet into the editor and click the icon to validate your input.
[ "Swiss Alps", "Rome", "Tokyo", "Maldives", "Tanzania", "Great Barrier Reef", "Petra", "Glacier National Park", "Paris", "Costa Rica" ] -
If you don't receive any error messages, click OK to confirm.
We now have our mock dataset filled with 10 destination names. Let's create the UI to display them.
Inserting a CSS responsive grid
- Right-click anywhere in the template editor and choose Insert (+).
- Locate the "Responsive CSS grid" layout in the toolbox, and click Configure.
- Click the icon to the right of the Items input. This toggles the input mode to a dynamic, data-bound value.
- Select
destinationNamesin the Items input. - Repeat step 3 and 4 for the Item text input, selecting
destinationNames -> itemas data source. -
Finally, set the Item min width to
300px.
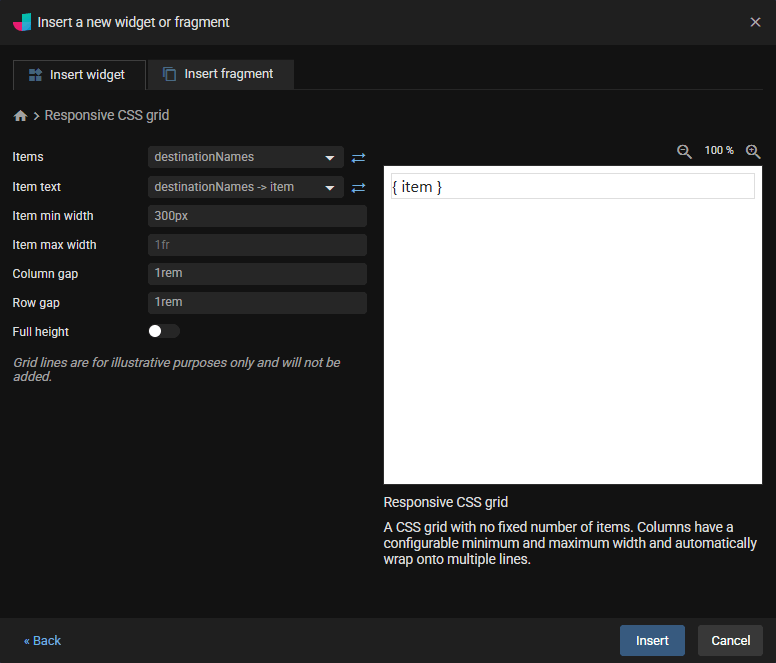
- Leave all other inputs as is and click Insert.
As you can see, a CSS grid has now been added, containing a For each widget that repeats its contents for each destination name. Note that in the component preview, you won't see the list of destinations: you only see it in the full Live Preview. Read in the documentation why this is the case.
Adding more destination data
Now what if we want to show a name and a picture for each destination? Then our list of destination names is not sufficient and we need a list of name/photo combinations. For this we are going to create our own data type named Destination.
- In the project explorer, go to the Data model tab and click Create a new type.
- Enter "Destination" as the name.
- You will now see an empty list of properties. To this list we are going to add our own properties for the name and picture of a destination.
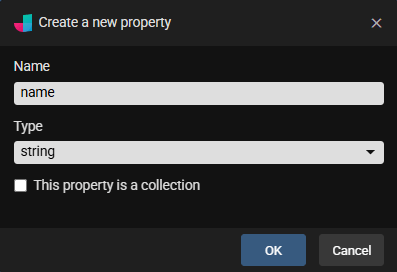
- Click the "+" button at the top of the Properties table.
- Enter "Name" as the name*, select
stringas the type and confirm.
- Repeat steps 4 and 5, now entering "photoUrl" as the name.
* Since we'll be importing JSON data again shortly, it's important that you use exactly these names.
Now the new data type is finished, and is ready to be used elsewhere in the project.
Enhancing the Destinations component
We are now going to add a new component property that uses our new data type, and which we will then also populate with test data.
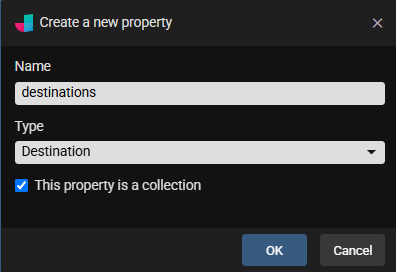
- Go back to the
Destinationscomponent and add a new component property. - Enter "destinations" for the property name, select the type Destination and check This property is a collection.
- Confirm and go to the initial value of the new property in the details pane.
- In the same way as with the
destinationNamesproperty above, import the following JSON snippet to populate the dataset.
[
    {
        "name": "Swiss Alps",
        "photoUrl": "https://media.jitblox.com/docs/quick-start/swiss-alps.png"
    },
    {
        "name": "Rome",
        "photoUrl": "https://media.jitblox.com/docs/quick-start/rome.png"
    },
    {
        "name": "Tokyo",
        "photoUrl": "https://media.jitblox.com/docs/quick-start/tokyo.png"
    },
    {
        "name": "Maldives",
        "photoUrl": "https://media.jitblox.com/docs/quick-start/maldives.png"
    },
    {
        "name": "Tanzania",
        "photoUrl": "https://media.jitblox.com/docs/quick-start/tanzania.png"
    },
    {
        "name": "Great Barrier Reef",
        "photoUrl": "https://media.jitblox.com/docs/quick-start/great-barrier-reef.png"
    },
    {
        "name": "Petra",
        "photoUrl": "https://media.jitblox.com/docs/quick-start/petra.jpg"
    },
    {
        "name": "Glacier National Park",
        "photoUrl": "https://media.jitblox.com/docs/quick-start/glacier-national-park.jpg"
    },
    {
        "name": "Paris",
        "photoUrl": "https://media.jitblox.com/docs/quick-start/paris.jpg"
    },
    {
        "name": "Costa Rica",
        "photoUrl": "https://media.jitblox.com/docs/quick-start/costa rica.jpg"
    }
]
Updating the grid
What remains now is to show the new test data in the UI. To do this, we must first update the data source of our grid items.
- Click on the For each loop in the template to open the details pane.
- Change the Collection from
destinationNamestodestinations. - You will now see a warning in the console that the inner
divelement no longer has a valid text binding. - Click on the inner
divelement and hit the "t" key to modify its text. - In the Bind to drop-down list, choose
destinations -> travelDestination.name.
If all went well, you will again see a list of names as intended in the full Live Preview. Next, we are going to extend the grid with photos.
You can now safely delete the destinationNames property if you want to; we don't need it anymore.
- Click on the inner
div, hit the "+" key and search for "img" in the toolbox. - Select the Image widget and click Configure.
- Click the icon to the right of the Source input to toggle the input mode.
- Select
destinations -> destination.photoUrlin the Source input. - For both the image width and height, enter a value of
250and click Insert.
We now have a working image grid with destination names. As a final step, we can make the layout a little bit neater.
- Click on the
divelement containing the image and name and hit the "q" key to focus the quick styling search input. - Locate the Flex utility category and pin it.
- Add the Enable flexbox utility as well as the Flex direction utility with a value of column.
Congratulations! You now master all the skills needed to quickly design and shape a web app and make it realistic using mock data. Happy designing!