Implementing navigation
In this section, you will learn how to let the end user navigate between pages in your app. To implement navigation, you use two special widgets in JitBlox: the Page link and the Page Area. The following example shows both widgets working together.
The technical term for user navigation in single-page web apps is "routing". If you are familiar with front-end frameworks or earlier versions of JitBlox, you may know Page Link as Router Link and Page Area as Router Outlet (or Router View).

- The Main Layout: this top-level component contains application elements which are the same regardless of which page the user is on, such as a header and footer.
- In the middle of the main layout is a Page Area: this is where the content of the active page is being displayed.
- The header contains two Page Links, which, when clicked by the user, cause the corresponding page to be displayed in the Page Area.
Creating a page link
Adding a page link in JitBlox is dead simple. You can find the navigation components in the Navigation group on the toolbox. Here are the basic steps to create a link to a page within your app:
- Make sure that your project has at least one Page with some visible content (you can create a new page from the Design panel in the explorer pane).
- Open the Main Layout component.
- Insert a new Page Area at the place where the page content should be displayed.
- Insert a new Page Link, give it some text and choose the Page from the first step as the Destination Page.
That's all there is to it. Repeat the last step for all other links you would like to add.
An alternative to the last step is to attach an event handler (typically a "click" handler) to an element. You can find event handlers in the details panel of an element. Click behind the event name to add an event handler and select "Navigate to a page". This method currently doesn't support setting URL parameters.
Using URL parameters
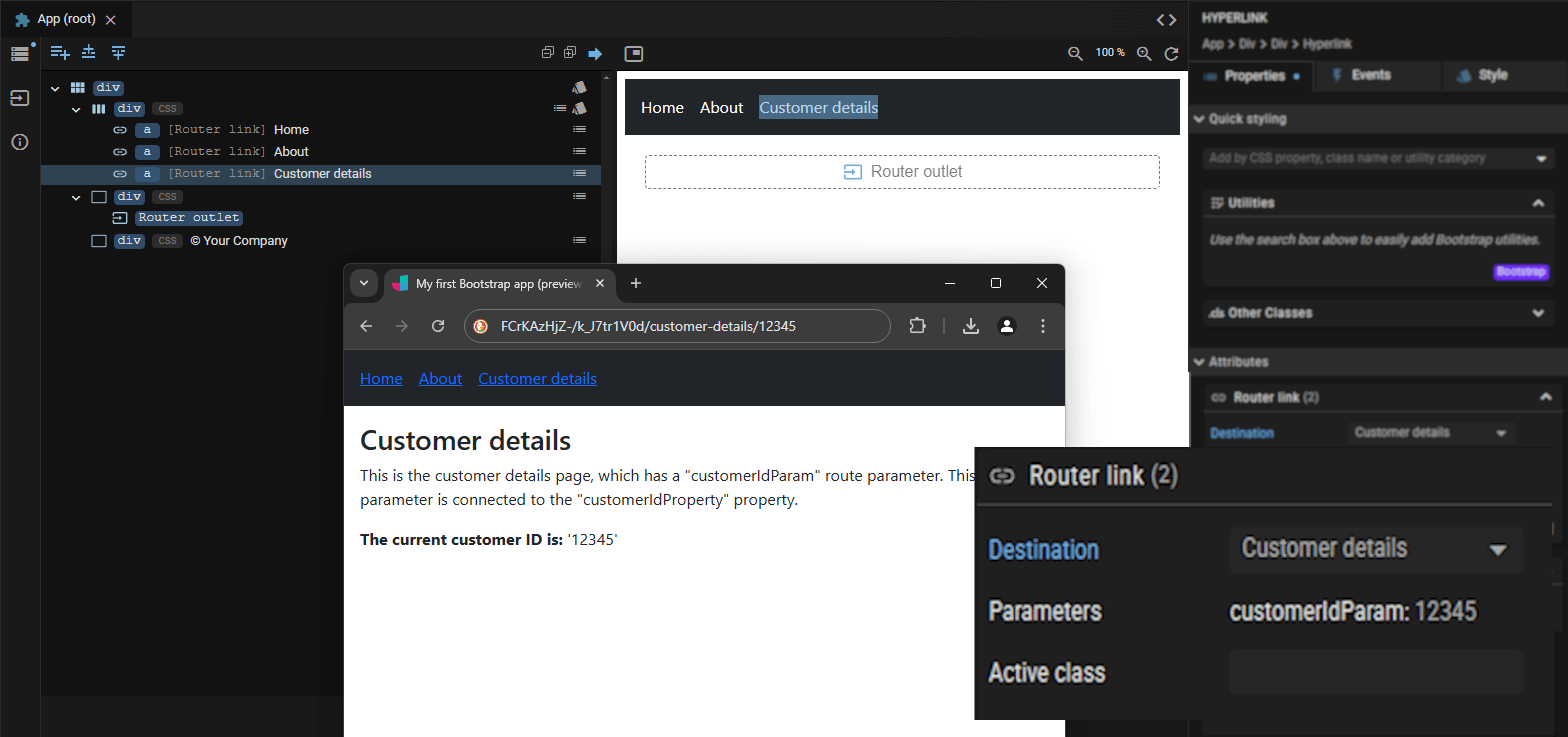
If a destination page requires variable input, you may also want to pass this input using a URL parameter. For example, you want to include a customerIdParam parameter in the URL, which the destination page can pass use to show data for that specific customer.
Implementing a URL parameter requires two steps: configuring the destination page and configuring the Page Link.
1. Configuring the destination page
- Create a URL parameter: Open the URL Parameters panel to the left of the template editor (use the button). Then click the plus icon to add the new parameter.
- Connect the URL parameter to a page property: Make sure your page has a property to which you can assign the parameter value, for example, customerId. In doing so, choose “A URL parameter” as the data source (see creating component properties for a how-to) and select the parameter created in the previous step.
For technical reasons, a route parameter can only have a simple (primitive) data type such as a string or integer: only primitive types can be included in a URL.
2. Configuring the Page Link
- Open the properties of the Page Link and find the "parameters" attribute.
- Notice the customerIdParam created in the previous step.
- Click the customerIdParam and assign it a value. In the example below, we assigned it a static value of 12345, but you can also assign a data-bound value.
Customizing a navigation path
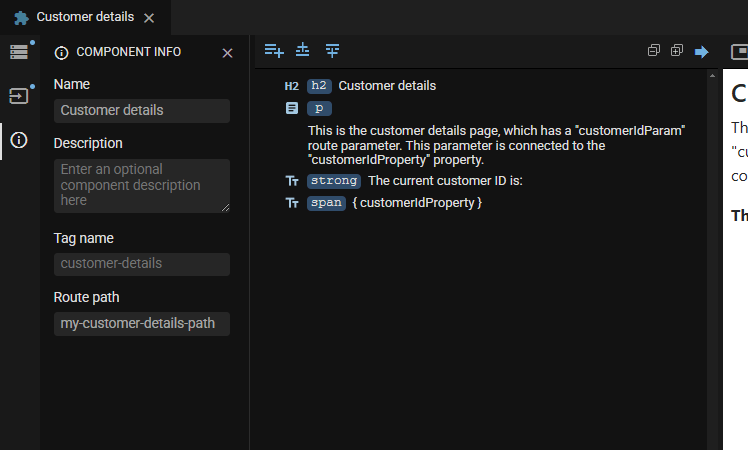
JitBlox automatically makes the page path (“customer-details” in the above example) the same as the name of the destination page. However, you can also customize it: you do so in the component info tab to the left of the template editor.
Implementing nested navigation
As a page within your app grows larger, you may want to divide it into different sections or tabs that users can navigate between. You can read more about how to do this in this blog post.